
Release date: May 25th 2025
Welcome to my Omnissa Horizon series. In this session I will describe how I upgraded the Horizon Linux Agent in my template to v. 2503. According to the Horizon 8 2503 Release Notes, there wasn’t any major noteworthy changes to the Linux Agent.
According to Omnissa’s official documentation, this agent-upgrade should be done as step 11 in the supported update sequence.

Before I start the actual Horizon Agent upgrade, I will download and install Ubuntu updates using the following commands:
sudo apt update && sudo apt upgrade -y
sudo reboot
sudo apt autoremove
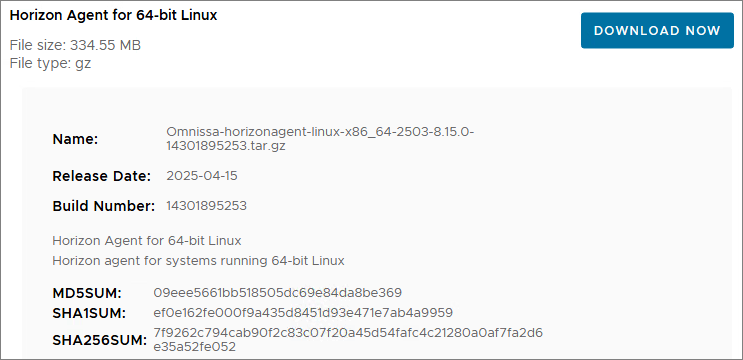
sudo apt autocleanNext, once the VM is powered up, I open VMware Remote Console and log in. I start by downloading the installation media from Omnissa Customer Connect
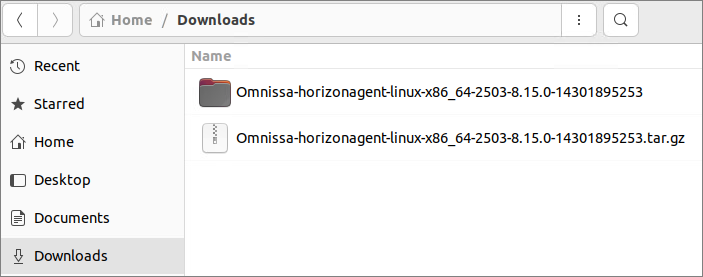
Once downloaded, I unpack it in the Downloads folder

Next, I log out from the desktop and reboot to ensure the VMwareBlastServer process isn’t running

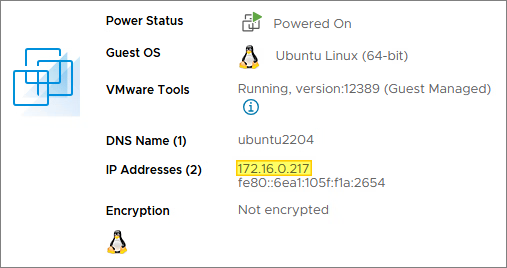
Before I can Putty into the desktop I need to know the IP address
I check the documentation to determine the correct command line options to use during upgrade here: Command-Line Options for Installing Horizon Agent for Linux

Although I could have used the Easy Setup Tool to do this installation, as described by Omnissa here: Configuration Parameters for the Easy Setup Tool, I opted to connect using Putty and run the following command to upgrade, documented here: Command-line Options for Installing Horizon Agent for Linux
sudo ./install_viewagent.sh -A yes -M yes --multiple-session -r yes
If You, like me, get an error about missing libnss3-tools, install this first running the commands below:
sudo apt update
sudo apt-get install libnspr4 libnss3 libnss3-tools
Once the installer is finished, it automatically reboots the VM. I can now adjust some options, shown below.
Setting Options in Configuration Files on a Linux Desktop
I will be adjusting the following parameters in the “/etc/omnissa/config” file
#Set clipboard redirection. Default is 2. 0 means disable; 1 means both directions; 2 means from client to agent only, 3 means from agent to client only.
Clipboard.Direction=1

#Set clipboard maximum size which should be specified in KBytes. Default is 1024 KBytes.
mksvchan.clipboardSize=1024

#Enable/Disable display scaling. This option only works if DPI sync feature is enabled.
Display scaling resizes the screen to auto fit the font size when the DPI is a mismatch between client and agent, the default value is FALSE.
rdeSvc.allowDisplayScaling=TRUE
I will be adjusting the following parameters in the “/etc/omnissa/viewagent-custom.conf” file
#Enable/Disable CDR. Default is TRUE
CDREnable=FALSE

#Enable/Disable USB. Default is TRUE
USBEnable=FALSE

#Enable/Disable Help Desk Tool. Default is TRUE
HelpDeskEnable=FALSE

#Instant Clone offline domain join solution, default value is 'pbis'.
#Its value could be 'pbis', 'samba' or 'none', and 'none' means disable.
#OfflineJoinDomain=none
OfflineJoinDomain=pbis
#OfflineJoinDomain=samba
Finally, I shut down the VM, take a Snapshot and deploy this to my Desktop and Application Farm. Once the Push-operation is done, I can verify the agent version in my virtual desktops

This completes the Linux Horizon Agent upgrade. I can now proceed with upgrading the Horizon GPO Bundle, posted here: Horizon – Upgrade Horizon GPO Bundle to v. 2503
Horizon 8 Documentation:
Omnissa Documentation:
- Rebranding Changes in Omnissa Horizon Products (6000681)
- Horizon 8 Upgrade Overview
- Product Interoperability Matrix
- Omnissa Product Documentation
Horizon planning, deployment etc.
Disclaimer: Every tips/tricks/posting I have published here, is tried and tested in different it-solutions. It is not guaranteed to work everywhere, but is meant as a tip for other users out there. Remember, Google is your friend and don’t be afraid to steal with pride! Feel free to comment below as needed.
