
Welcome to my RSA SecurID section. This session is a result of a customer-request, and I though I’d do this in my LAB first. RSA SecurID remains important in today’s security landscape because it provides a proven, multi-factor authentication (MFA) mechanism that raises the cost of account takeover and unauthorized access. While adaptive, phishing-resistant MFA methods (FIDO2, passkeys, hardware-backed WebAuthn) are rising, SecurID remains valuable for broad compatibility, existing enterprise deployments, and transitional architectures. Big thanks to RSA for providing me with necessary NFR-licenses and tokens etc.
The goal of this setup is to be able to login through my UAG to my Omnissa Horizon Desktops, using RSA SecurID.

To do this I will have to establish the RSA SecurID Authentication Manager infrastructure. I have divided the setup into the parts below.
- Preparations
- Setup and Configuration Information List
- Firewall
- Quick Setup Checklist for the Primary Instance
- Quick Setup Checklist for the Replica Instance
- Deploying Primary Instance
- Configure Primary Instance (Quick Setup)
- Console Certificate
- Connect to MS Active Directory
- Add identity Source
- Upgrade
- Deploy Secondary Instance
- Agent
- Hardware Tokens and user-assignment
- Create Decrypt Codes
- Decrypt Token Records
- Import Token Seed
- Assign Hardware Token
- Configure RSA Authentication inUAG
- Test login with RSA Token
Preparations
I make use of the the Setup and Configuration Information List, the Quick Setup Checklist for the Primary Instance and the Quick Setup Checklist for the Replica Instance, RSA has provided in the RSA Authentication Manager 8.8 Setup and Configuration Guide
Setup and Configuration Information List
I use the following list to specify setup and configuration information for RSA Authentication Manager.
| Element | Decision |
| VMware OVA package location | |
| Fully qualified domain name | DNS-registered FQDN of both primary and secondary appliance |
| IPv4 Static IP address | |
| IPv4 Subnet mask | |
| IPv4 Default Gateway | |
| IP address of the DNS servers |
Firewall
I make sure to open neccassary firewall ports in my firewall to allow management, authentication, AD trafic etc as described by RSA here: Ports for the RSA Authentication Manager Instance
Quick Setup Checklist for the Primary Instance
- Appliance license file
- During Quick Setup, you must have access to the .zip license file. You download the license file (.zip) at https://my.rsa.com.
- Hostname or IP address of an NTP server
- RSA recommends that you specify a local or Internet Network Time Protocol (NTP) Server
- Operating system password
- Choose a password to access the appliance operating system for troubleshooting and advanced administration
- User ID and password for initial administrator accounts
- Choose a User ID and password to create the following:
- Initial Security Console administrator User ID and password for the Super Admin role
- Operations Console administrator User ID and password
- Choose a User ID and password to create the following:
Quick Setup Checklist for the Replica Instance
- Replica package file location.
- To set up a replica appliance, you must have access to the replica package file.
- Hostname or IP address of an NTP server
- RSA recommends that you specify a local or Internet Network Time Protocol (NTP) Server
- Operating system password
- Choose a password to access the appliance operating system for troubleshooting and advanced administration
Deploying Primary Instance
Deploying the primary RSA Authentication Manager instance is the foundational step in establishing a secure, scalable Multi‑Factor Authentication (MFA) environment using RSA SecurID. The primary instance acts as the core of the deployment, hosting the system database, managing authentication policies, and serving as the central point for administration and replica synchronization.
Prerequisites:
- Download your installation files, license and tokens from my.rsa.com.
- Proper DNS records and Static IP(s) reserved for primary instance
- Network connectivity to AD, DNS, PKI, NTP
- Open firewall ports and proper routing / VLAN segmentation
- Sufficient hardware/VM resources and OS compatibility for the primary instance.
Before I start the OVF Deployment, I allocate an ip-address and create a DNS-record for this instance.

As this is a pretty vanilla OVF-deployment I will do a quick run-through with screenshots below…


RSA Documentation:
RSA Authentication Manager 8.8 Setup and Configuration Guide
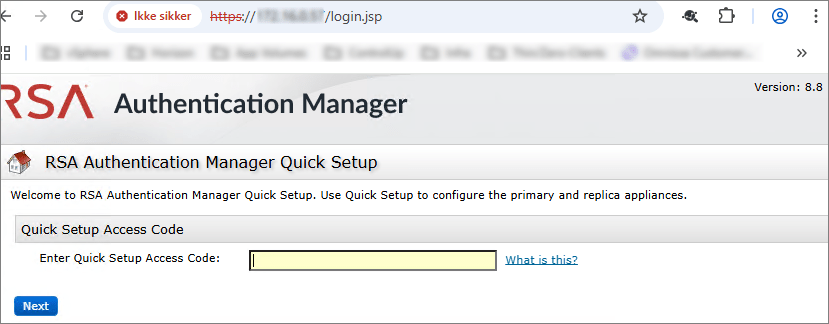
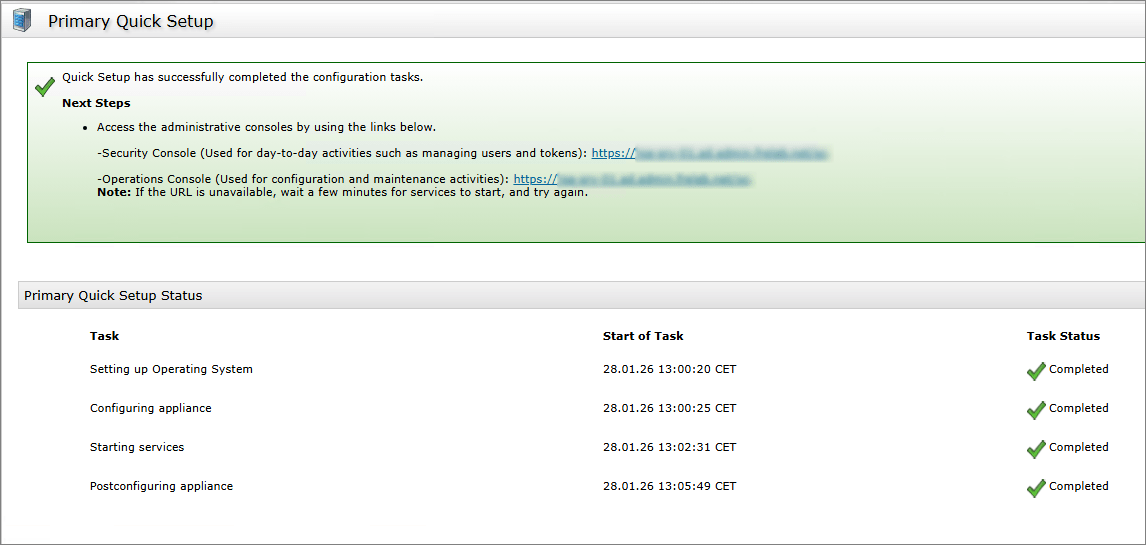
Configure Primary Instance (Quick Setup)
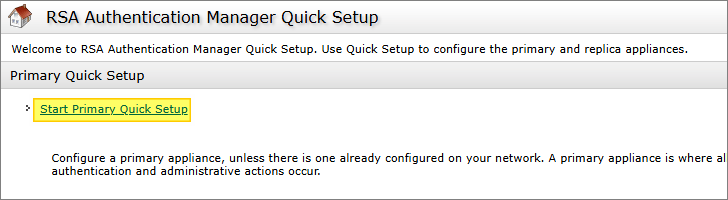
I enter the Quick Setup Access Code which I got from the VMware Web-Console above, I Agree to Terms afterwards and launch “Start Primary Quick Setup“…
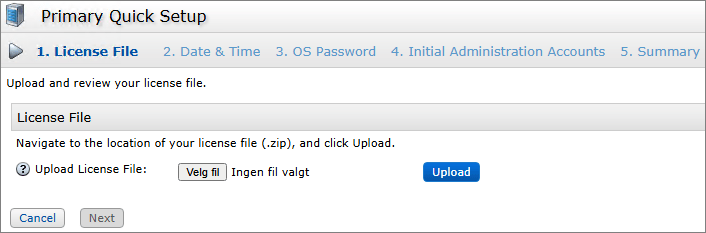
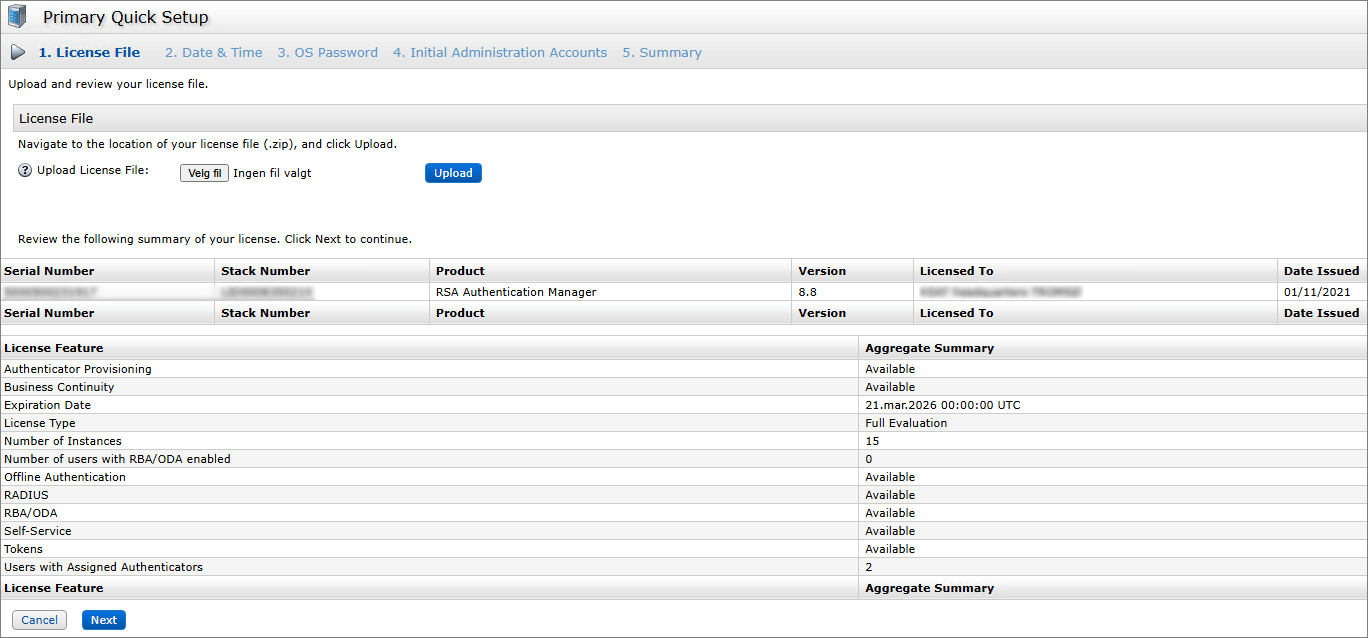
Click “Start Step 1“, upload license-file, Next…
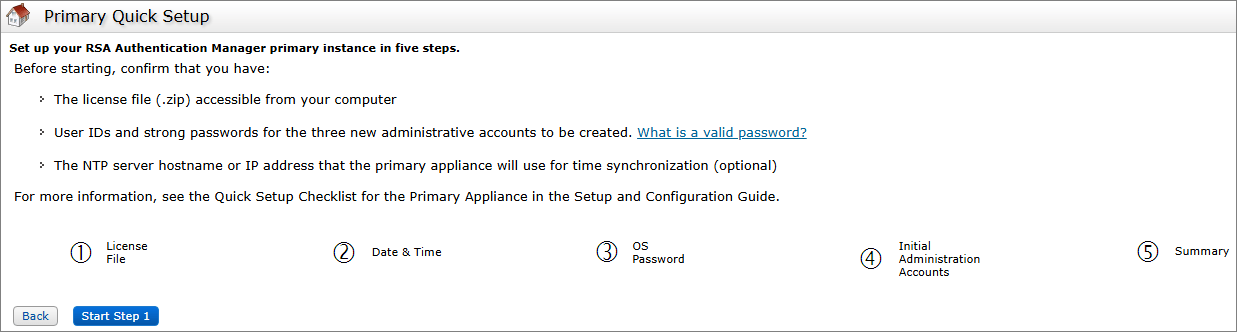
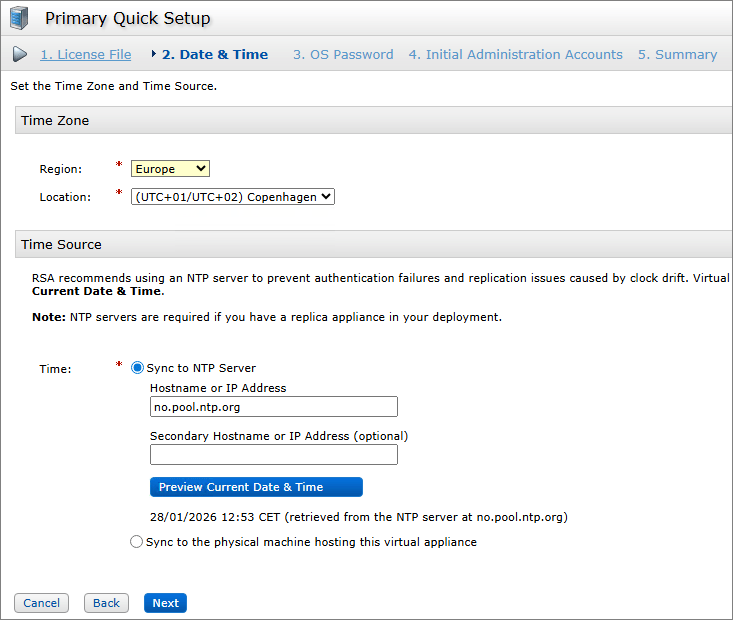
Adjust Region, Location and NTP-settings, Next…
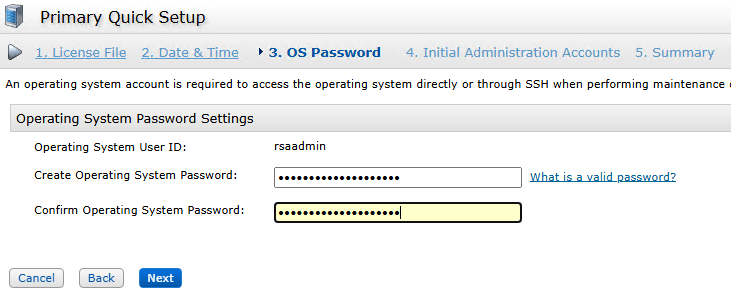
Create credentials for the admin-accounts, Next…

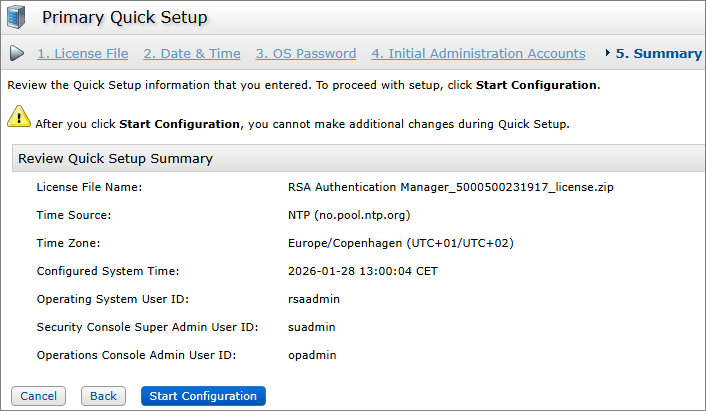
Verify settings, Start Configuration…
RSA Documentation:
RSA Authentication Manager 8.8 Setup and Configuration Guide
Console Certificate
Replacing the default/self‑signed certificate used by the RSA Authentication Manager Console with a CA‑signed certificate is mainly about trust, security assurance, and operational hygiene. I start out by creating the certificate request in the RSA Operations Console:
- Go to Deployment Configuration → Certificates → Console Certificate Management.
- In In the Console Certificate Management page, click Generate CSR.

In the Generate Certificate Signing Request page, under Certificate Basics, enter the requested information and click Generate File. I download the CSR-file and have the CA create a certificate for me.

RSA Documentation:
Generate a Certificate Signing Request Using the Operations Console
Next, I import the trusted root and signed certificates and activate them.
- Go to Deployment Configuration → Certificates → Console Certificate Management. Click Import Certificate, browse and select certificate-file, Import…


RSA Documentation:
Finally I activate the new Console Certificate and restart the instance.


Connect to MS Active Directory
This is a 3-step procedure, first export ldaps certificate from a domain controller, next import this in RSA Authentication Manager and last, connect Identity Sources.
First, I export Domain Controller Certificate


Next, I import LDAPS-certificate in the RSA Operations Console.
- Go to Deployment Configuration → Certificates → Console Certificate Management
- Click Import Certificate, browse and select certificate-file, Import…


Add identity Source
This is done from the RSA Operations Console.
- Go to Deployment Configuration → Identity Sources → Add New…
I provide the necessary Identity and Directory information:

RSA Documentation:
Upgrade
Upgrading RSA Authentication Manager (AM) with patches involves preparation, backup, correct patch selection, and applying the update safely. RSA explicitly recommends backing up before any patch or major upgrade and to verify replica health.
This is done from the RSA Operations Console:
- Maintenance → Update & Rollback…
- I verify the running version and click Upload & Apply Update → Browse and select file → rsaadmin-password → Apply…


RSA Documentation:
Deploy Secondary Instance
High availability (HA) is critical in an RSA Authentication Manager deployment because the system is responsible for validating user authentication requests across your entire organization. Any downtime can immediately block access to VPNs, applications, servers, and network resources.
Prerequisites:
- Know your primary AM server version, build, and deployment type (virtual appliance vs. physical).
- Administrative access to primary AM console (Security Console / Admin UI) and to the OS or appliance management.
- Network connectivity between primary and secondary
- Sufficient hardware/VM resources and OS compatibility for the secondary instance.
- Back up primary AM configuration and the RSA Data Store before starting.
- Time sync (NTP) configured on both servers.
- Proper DNS records and IPs reserved for secondary instance
Before I deploy the secondary instance, I prepare IP-address, DNS-record and download the replica package from the primary instance using the RSA Operations Console.

I deploy the new instance as I did the first instance, power it up and wait for the Console to load. Once done, I open the URL specified and enter the Quick Setup Access Code…


I click “Start Replica Quick Setup”…


I enter the same Time and User-settings as I did with the primary instance.


Start Configuration…

When ready, I click Begin Attach, verify that the prerequisites are met and attach the Replica Package File, Next…


I provide the correct credentials, Next…


Once finished, I verfify the Replication Status Report, looks good….


Agent
An RSA agent is a software component installed on an application, server, or network device that integrates with RSA Authentication Manager to enforce strong authentication. The agent intercepts user authentication requests and forwards them to the Authentication Manager for validation, enabling the use of RSA tokens, one‑time passcodes (OTP), or other supported authentication methods without the application storing sensitive credential data itself.
MS Copilot
I will add the Omnissa Unified Access Gateway (UAG) to RSA Authentication Manager by creating it as an authentication agent in RSA, then configuring the matching RSA SecurID settings on the UAG.
This part is done in the RSA Security Console.
- Go to Authentication → Authentication Agents → Add New
- I provide the FQDN for my UAG, click Resolve IP and choose Standard Agent, Save…


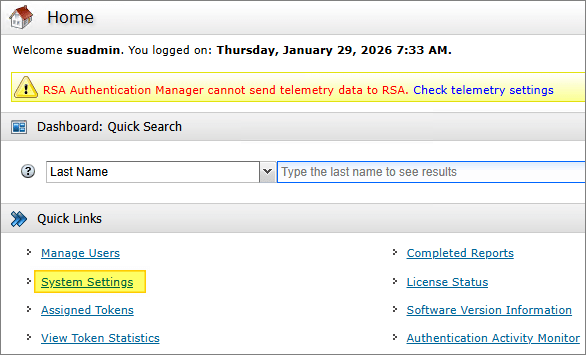
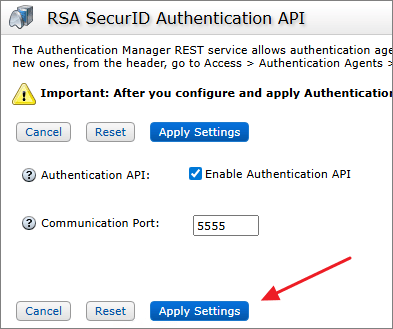
- As I will be connecting using the API, I go to System Settings → RSA SecurID Authentication API, enable Authentication API and verify Port number, Apply Settings…

Hardware Tokens and user-assignment
RSA hardware tokens are physical authentication devices that generate time‑based or event‑based one‑time passcodes (OTPs) to provide strong, two‑factor authentication. Each token is uniquely registered in the RSA Authentication Manager system and assigned to a specific user. User assignment links the token’s OTPs to the individual’s account, ensuring that access requires both something the user knows (password/PIN) and something they have (the hardware token).
MS Copilot
Create Decrypt Codes
As the token seeds are protected by encryption, I first have to create decryption codes. In the material from RSA, these came on a CD (In the Lords year of 2026?), and was a fairly straigh-forward process to do, when following the guide: RUN_ME_FIRST


Decrypt Token Records
To decrypt the Token Records I use the supplied (on the CD): RSA SecurID Token Record Decryption Utility


Import Token Seed
RSA provides an XML file that contains the token records that your organization has purchased. Before you can work with individual token records, you must import the token record XML file into Authentication Manager.
This part is done in the RSA Security Console.
- Go to Authentication → SecurID Tokens → Import Tokens Job → Add New.
- I provide a name for the import job, select the correct Security Domain, browse and select my import fil, provide password and Submit Job…


Assign Hardware Token
Assigning a token associates the token with a specific user. You must assign a token to a user before the user can authenticate.
This part is done in the RSA Security Console.
- Go to Identity → Users → Manage Existing
- Use the search fields to find the users to whom you want to assign tokens.
- From the search results, click the user(s) to whom you want to assign tokens.
- Assign Hardware Tokens…


Configure RSA Authentication in UAG
Before I start, I will get hold of the RSA Agent Access Key.
This part is done in the RSA Security Console.
- Go to Acess → Authentication Agents → Agent Credentials → Manage Existing

To configure SecurID in my Omnissa UAG, I login to the Admin-GUI (9443), open up Authentication Settings and click RSA SecurID.

I provide the hostname of the RSA AM (FQDN), the Port Number, Access Key and upload the SSL-certificate for the RSA AM. I also provide the UAG Connector Instance Name, which I created under the Agents-section above, enter a Name Id Suffix, Save…

Next I open up Edge Service Settings and click the Horizon Settings.

Almost at the bottom of the page, I click More…

I select SecurID as the Auth Method, Save…

Test login with RSA SecurID Token
To test my new setup, I launch Omnissa Horizon Client. Once connected, I provide my username and the passcode from the RSA Hardware Token.

At first-time login, I will need to supply a PIN-code as well. (This is a Policy-setting in RSA AM which can be adjusted as needed)


Once the new PIN is accepted, I get access to my Omnissa Horizon resources as normal, test completed.
Finally, I export settings as described here:
- Generate a Report of the Current Configuration Settings
- Exporting and Importing Users and Tokens Between Deployments
This concludes my session about setting up the RSA Authentication Manager infrastructure. I hope this is helpful to others who are going to be doing this execise.
Disclaimer: Every tips/tricks/posting I have published here, is tried and tested in different it-solutions. It is not guaranteed to work everywhere, but is meant as a tip for other users out there. Remember, Google is your friend and don’t be afraid to steal with pride! Feel free to comment below as needed.