
Release date: August 31st 2021
Welcome to my Microsoft Tips & Tricks section. In this session I will describe how I added applications, operating systems etc. to my deployment share, and how I created a VMware OSOT Task Sequence to automate the creation of my VMware Horizon templates. The goal of this session is to end up with a Windows 10 Build 2004 with MS Office, 7-Zip, Chrome and Edge Chromium, which I can use as a template with VMware Horizon. As this session is a part of my bigger session VMware Horizon – Automating Template Creation & Maintenance, it will be focused on the configuration used when creating new templates for VMware Horizon. I suppose some element can be used when configuring a task sequence for physical clients, but that isn’t the focus or reason for making this session.
Before I start creating and configure my VMware OSOT Task sequence, I will add some applications, operating system and the necessary VMware Agents and tools to the deployment.
- Microsoft Office 365 Pro Plus
- Microsoft Teams
- 7 Zip
- Google Chrome
- MS Edge Chromium
- Operating System: Windows 10 Build 2004
- VMware Agents and tools
Once the above components are in place, I will continue with creating and editing the task sequence. Finally I will do a quick test-run to see that all tasks are run without errors.
- Create VMware OSOT Task Sequence
- Configure VMware OSOT Task Sequence
- Test Task Sequence
Microsoft Office 365 Pro Plus
Microsoft Office 365 Pro Plus
I start out by adding MS Office 365 Pro Plus to my deployment. To do this, I first need to download and install the MS Office Deployment Tool.

I select a folder for the extracted files


Once the files are extracted, I create a configuration.xml file to download MS Office 365 Pro Plus. There are plenty of resources on the web to help creating the configuration file, but as my setup is fairly simple, I just make a copy of the file supplied by Microsoft and edit it to my suit my needs.


<Configuration>
  <Add OfficeClientEdition="64" Channel="Monthly">
    <Product ID="O365ProPlusRetail">
      <Language ID="nb-no" />
      <ExcludeApp ID="Access" />
      <ExcludeApp ID="Groove" />
      <ExcludeApp ID="OneDrive" />
      <ExcludeApp ID="OneNote" />
      <ExcludeApp ID="Publisher" />
      <ExcludeApp ID="Lync" />
      <ExcludeApp ID="Teams" />
    </Product>
  </Add>
  <Property Name="SharedComputerLicensing" Value="1" />
  <Property Name="SCLCacheOverride" Value="0" />
  <Property Name="AUTOACTIVATE" Value="0" />
  <Property Name="FORCEAPPSHUTDOWN" Value="FALSE" />
  <Property Name="DeviceBasedLicensing" Value="0" />
  <Display Level="None" AcceptEULA="True" />
  <AppSettings>
    <Setup Name="Company" Value="FreLab" />
  </AppSettings>
</Configuration>
To download the MS Office installation files, I run the following command
setup.exe /download configuration.xml
The command above will create a folder named Office and add the office installation files to this folder

I can now add Office 365 Pro Plus as an application in the Deployment Workbench

When the “New Application” wizard launches, I select “Application with source files”, Next…

I supply details about the application, Next…

I browse and select the folder containing the MS Office installation files, Next…

I leave the destination name as is, Next…

Fill in the command line parameters for the office installation and the working directory information, Next…
setup.exe /configure configuration.xml
I finally review the settings I just entered in, Next…

Once the process has finished successfully, Finish…

Microsoft Teams
Microsoft Teams Machine-wide Install
I start by downloading the msi fil from MS here: 64-bit version

In Deployment Workbench, launch the “New Application” wizard

When the “New Application” wizard launches, I select “Application with source files“, Next…

Supply some details about the application, Next…

Browse and select the location of the downloaded msi-file, Next…

I leave the destination name as is, Next…

Fill in the command line parameters for silent install and the working directory information, Next…
msiexec.exe /i Teams_windows_x64.msi ALLUSER=1 ALLUSERS=1
I finally review the settings I just entered in, Next…

Once the process has finished successfully, Finish…

7-Zip
7 Zip
Before I add 7 zip to my deployment, I go to 7-zip.org and download the latest MSI version for my operating system. I save the file to a local folder, under the Manufacturer and Version

In Deployment Workbench, launch the “New Application” wizard.

When the “New Application” wizard launches, I select “Application with source files”, Next…

Supply some details about the application, Next…

Browse and select the location of the downloaded msi-file, Next…

I leave the destination name as is, Next…

Fill in the command line parameters for silent install and the working directory information, Next…
msiexec.exe /I 7z1900-x64.msi /qb
I finally review the settings I just entered in, Next…

Once the process has finished successfully, Finish…

Finally, I can now deploy 7-Zip from my Deployment Share

Google Chrome
Google Chrome
To add Google Chrome to my deployment, I need to download the Enterprise bundles from Google, here: Download Chrome browser for your enterprise. I save the file to a local folder, under the Manufacturer and Version.
I repeat the process I used to add 7-Zip above, just a different command line. In Deployment Workbench, launch the “New Application” wizard…

When the “New Application” wizard launches, I select “Application with source files”, Next…

I supply details about the application, Next…

I browse and select the location of my downloaded enterprise bundles, Next…

I leave the destination name as is, Next…

I fill in the command line parameters for the silent install and the working directory information, Next…
msiexec /i GoogleChromeStandaloneEnterprise64.msi /qn /norestart
Next…

Once the process has finished successfully, Finish…

MS Edge Chromium
Microsoft Edge Chromium
To add Microsoft Edge Chromium to my deployment, I first download the latest MSI version for my operating system from: https://www.microsoft.com/nb-no/edge/business/download. I save the file to a local folder, under the Manufacturer and Version
I repeat the process I used to add 7-Zip and Chrome above, just adjust the command line. In Deployment Workbench, I launch the “New Application” wizard.
When the “New Application” wizard launches, I select “Application with source files“, Next…

I supply details about the application, Next…

Browse and select the location of the downloaded msi-file, Next…

I leave the destination name as is, Next…

Fill in the command line parameters for silent install and the working directory information, Next…
msiexec.exe /i MicrosoftEdgeEnterpriseX64.msi /qn
Next…

Once the process has finished successfully, Finish…

Windows 10 Build 2004
Operating System – Windows 10 Build 2004
Once the applications are added to my deployment successfully, I will add a operating system. Before I start the process of adding a operating system, I have connected the Windows 10 Build 2004 ISO to the MDT-server. To add an operating system, I launch the “New Operating System” wizard inside the Deployment Workbench.

I will be adding a full set of source files, Next…

I click “Browse” and select the DVD Drive containing Windows 10 Build 2004, Next…


I enter a destination directory name, Next…

I review the settings, which looks good, Next…

When the process finishes successfully, Finish…

As the above process imports all available Windows 10 Build 2004 versions on the ISO, I will delete those version I won’t be using.

Next…

Next…

Successful process, I repeat the above process with all other surplus Windows versions, Finish…

VMware Agents and tools
VMware Agents and Tools
To add the necessary VMware Agent and tools to my Deployment, I copy the agent installers to the correct sub-folder in the deployment share. When new versions are required in the future, I will simply replace these with newer agents. I downloaded the necessary software from the sources below.
- VMware Agents and VMware Tools: https://my.vmware.com/group/vmware/
- Vmware Tools optional latest Download URL
- VMware OS Optimization Tool: https://flings.vmware.com/vmware-os-optimization-tool
- sDelete: https://docs.microsoft.com/en-us/sysinternals/downloads/sdelete
- LGPO: https://www.microsoft.com/en-us/download/details.aspx?id=55319


Next I add VMware OS optimization Tool, sdelete and LGPO executables to the OSOT sub-folder.

I make sure to check “Unblock” on the executables


Finally, I download and copy the VMware Tools Installer into the VMwareTools subfolder.

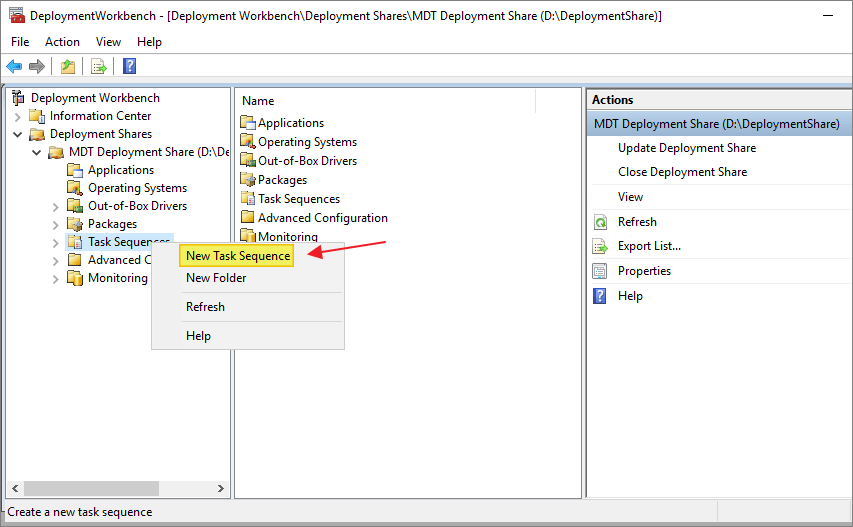
Create VMware OSOT Task Sequence
Create OSOT Task Sequence
After having done all the preparations above, it’s finally time to create the VMware OSOT task sequence.
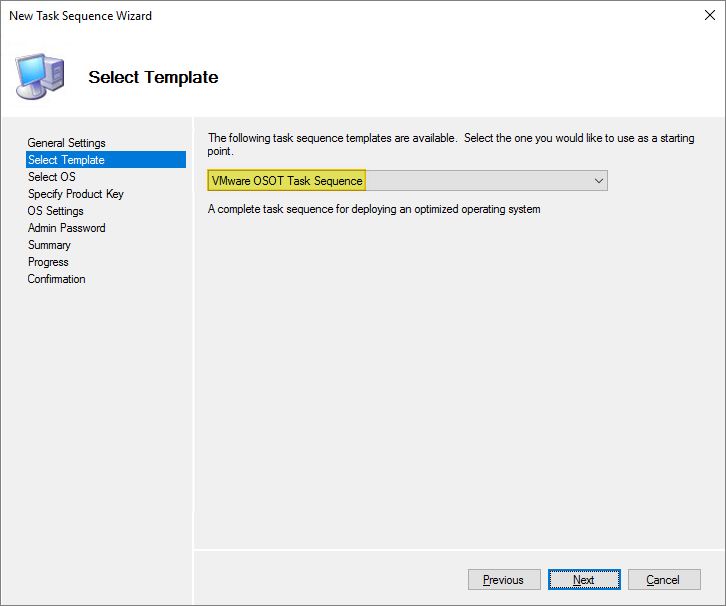
When the “New Task Sequence” wizard launches, I specify my general information, Next…

I select “VMware OSOT Task Sequence“, Next…
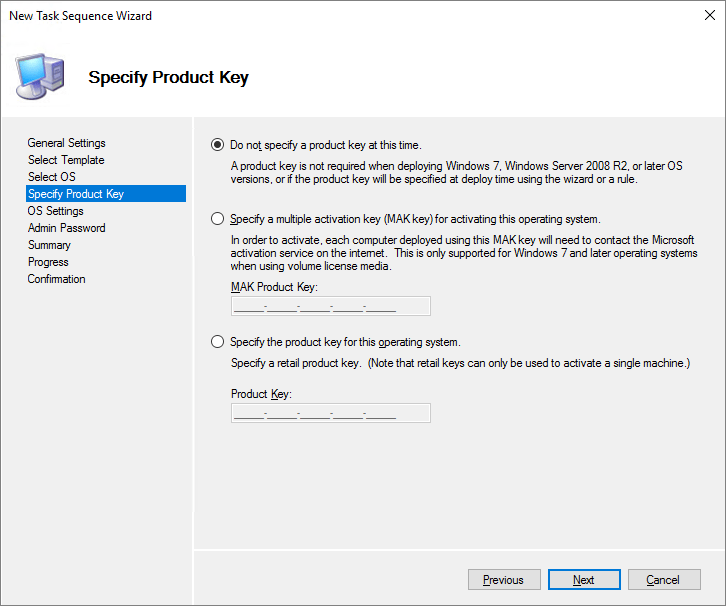
I select the Windows version I imported above, Next…

No product key at this time, Next…
Fill in some OS settings, Next…
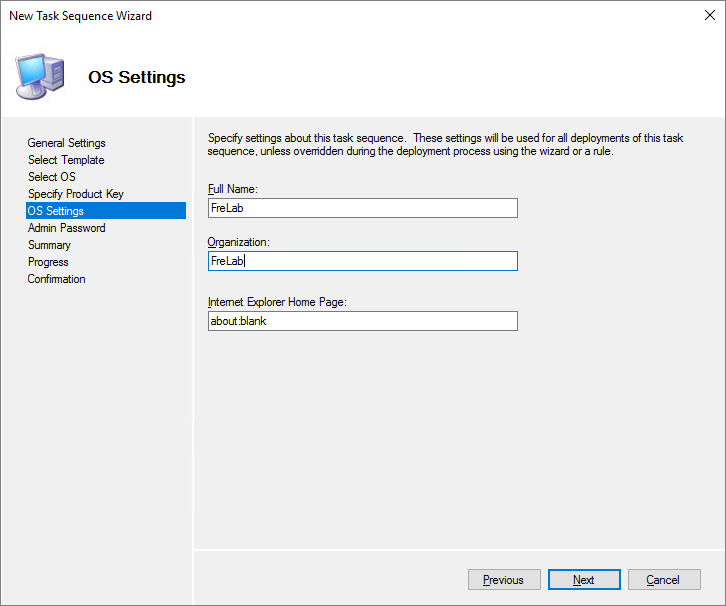
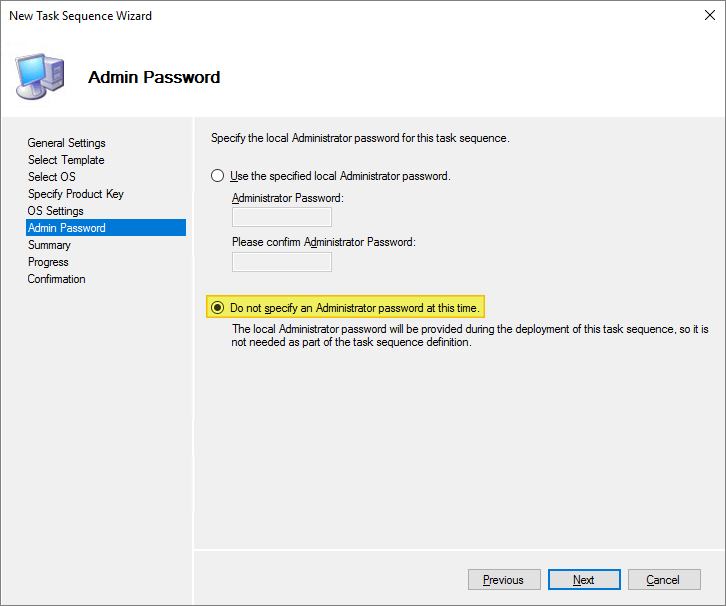
I select “Do not specify an Administrator password at this time“, Next…
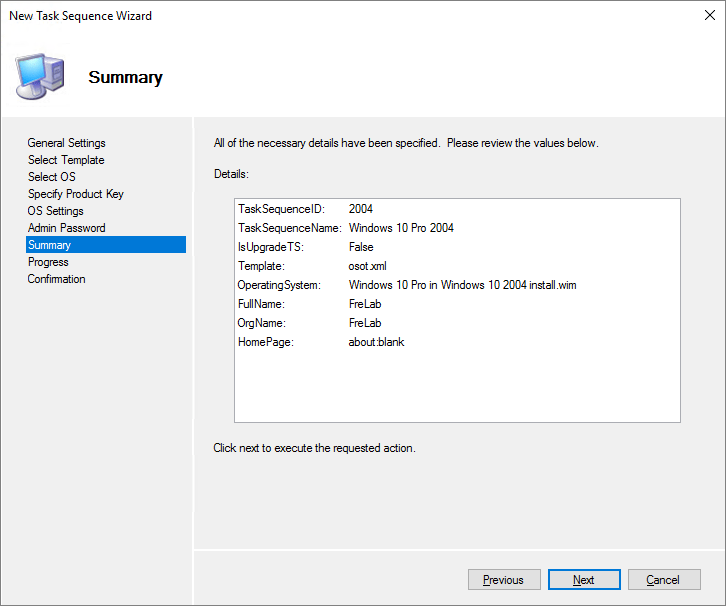
I review the settings I have chosen, looks excellent, Next…
Once the process has finished successfully, Finish…

Configure VMware OSOT Task Sequence
Configure the VMware OSOT Task Sequence
During a manual creation of a VMware Horizon template, it is critical to boot Windows into Audit Mode before applying the VMware OSOT optimizations etc. I will do the same here by editing the unattend.xml. First I generate a catalog for the operating system image and use Windows System Image Manager (SIM) to edit the answer file for an unattended installation. I right-click my task sequence and click Properties.

From the OS Info tab, click “Edit Unattend.xml“

Drag “Reseal” to oobeSystem

Select Audit as Mode under Reseal Properties.

Delete “Display”

I set “NetworkLocation” to Work and save and close the Windows SIM.

DotNet Framework 3.5 Feature
.Net Framework 3.5 Feature
From the Task Sequence tab, I add .NET Framework 3.5 in the Install Roles and Features section.

From the Options tab, i deselect “Disable this step“, Apply…

VMware Tools
VMware Tools
In the VMware Tools section, I make my selection for what feature and drivers I will install for VMware Tools. Check out “Manually Creating Optimized Windows Images for VMware Horizon VMs” from VMware Digital Workspace Tech Zone, for info about which components of VMware Tools to use for VMware Horizon.

Add Applications
Add Applications
It’s now time to add some applications to my Task Sequence. I will be adding all my applications, except Microsoft Teams, as described with 7-Zip below.
7-Zip
I right-click and copy the Install Application section

I select “Install a single application” and Browse…

I select 7-Zip

Once done I repeat the procedure above and add Google Chrome, Microsoft Office 365 Pro Plus and the rest of the applications to the task sequence


Microsoft Teams
Adding MS Teams to a VDI Task sequence is a little different from the above example, because this requires that I add a registry setting before pushing the Teams Machine-wide installer, described by Microsoft here: Teams for Virtualized Desktop Infrastructure

reg add "HKLM\SOFTWARE\Microsoft\Teams" /v IsWVDEnvironment /t REG_DWORD /d 1 /fI add the above registry setting using a “Command Line” task as show below

Below this I can now add the Install Teams Task

OSOT-Optimize
VMware OS Optimization Tool – Optimize
I customize the VMware OSOT optimization-settings and add a restart after optimization is done.

OSOT-Generalize
VMware OS Optimization Tool – Generalize
I customize the VMware OSOT generalization-settings and add a restart after the generalization is done. As generalize resets some setting that the optimization set above, I re-run optimization with reboot.

Horizon Agent
VMware Horizon Agent
I customize the VMware Horizon Agent settings and make sure to add a restart afterwards. (Maybe not longer necessary, but doesn’t hurt).

Dynamic Environment Manager Agent
VMware Dynamic Environment Manager Agent
Customize the VMware Dynamic Environment Manager agent settings

OSOT-Finalize
VMware OS Optimization Tool – Finalize
I make my choices for the Finalize task. I wont release the IP address at this step, as I will install the VMware App Volumes Agent after this task has run.

Nvidia GPU Driver
Nvidia GPU Driver
I don’t have NVIDIA GPU’s in my ESXi servers, but if I did, I would install the NVIDIA Windows driver at this point in the task sequence.
App Volumes Agent
VMware App Volumes Agent
I add the FQDN of my App Volumes Manager and select default port: 443.

From the Options tab, i deselect “Disable this step”

This concludes this session about configuring the task sequence with applications, operating systems etc. I can now wrap this series up by scripting the automation with VMware PowerCLI, posted here: VMware Horizon – Automating Template Creation & Maintenance
VMware Digital Workspace Tech Zone: Using Automation to Create Optimized Windows Images for VMware Horizon VMs
Microsoft Tips & Tricks section
Disclaimer: Every tips/tricks/posting I have published here, is tried and tested in different it-solutions. It is not guaranteed to work everywhere, but is meant as a tip for other users out there. Remember, Google is your friend and don’t be afraid to steal with pride! Feel free to comment below as needed.