
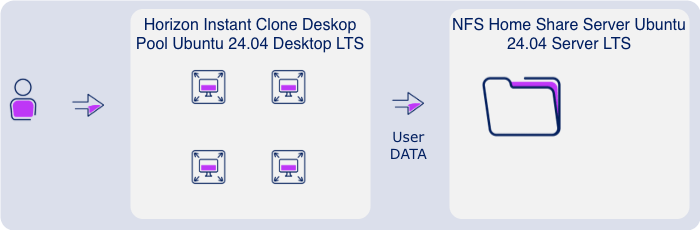
This page documents the steps I took to build an Ubuntu 24.04 LTS Desktop golden image for use as an Omnissa Horizon Instant Clone template in my Lab environment. The template uses the Horizon Agent 2506 Easy Installer, realmd and SSSD for AD domain join, and pam_mount with NFS for home directory mounting at login. Since this is an Instant Clone template, the template is not domain joined at snapshot time — Horizon handles domain join for each clone at provision time using a dedicated service account.
Environment
| Template VM | ubt-2404-tpl |
| OS | Ubuntu 24.04 LTS Desktop (Noble) |
| Horizon Agent | 2506 (Omnissa-horizonagent-linux-x86_64-2506-8.16.0) |
| Domain | domain.local |
| Pool | HZUBTP1 (Ubuntu instant clone pool) |
| Pool-access | GU_HZ_HZUBTP1 (AD Entitlement Group) |
| NFS home server | nfsserver.domain.local |
| NFS export | /srv/home/hzubtp1 |
Prerequisites
- Ubuntu 24.04 LTS Desktop ISO
- Horizon Agent 2506 Linux installer package (tar.gz) downloaded from Omnissa
- DNS A and PTR records created for the template VM before starting
- NFS home directory server already set up (see Ubuntu NFS Home Directory Server Setup)
- A dedicated domain join service account with permissions to join computers to the correct OU
- The computer OU DN where instant clone computer accounts should be created
Step 1 – OS Installation
Install Ubuntu 24.04 LTS Desktop using the standard installer. During installation set the hostname to your template naming convention. After installation, fix /etc/hosts — the installer places a loopback entry using 127.0.1.1 which needs to be replaced with the actual IP and FQDN. Also disable IPv6 to keep things clean in a Windows-dominated AD environment:
# Fix /etc/hosts - comment out the 127.0.1.1 line and add the real IP# 127.0.1.1 ubt-2404-tplx.x.x.x ubt-2404-tpl.domain.local ubt-2404-tpl# Disable IPv6sudo tee -a /etc/sysctl.conf << 'EOF'net.ipv6.conf.all.disable_ipv6 = 1net.ipv6.conf.default.disable_ipv6 = 1net.ipv6.conf.lo.disable_ipv6 = 1EOFsudo sysctl -p
Step 2 – Install VMware Tools and SSH
Use the open-vm-tools-desktop variant — this includes display and clipboard components needed for vSphere console access and Horizon. Plain open-vm-tools is for headless servers only.
sudo apt update && sudo apt upgrade -ysudo apt install -y open-vm-tools-desktop openssh-server
Verify VMware Tools is running:
sudo systemctl status open-vm-tools --no-pager
Step 3 – Install Horizon Agent Prerequisites
The following packages are required before running the Horizon Agent installer. The full list is documented in the Omnissa documentation – Install Linux Dependency Packages for Horizon Agent.
sudo apt install -y libnss3-tools pulseaudio-utils ca-certificates curl gpg apt-transport-https software-properties-common
Shut down the VM and take a snapshot in vSphere at this point — call it something like 01-base-prereqs. This gives a clean rollback point before running the agent installer.
Step 4 – Install Horizon Agent
Copy the Horizon Agent installer to the VM via SCP and extract it:
scp Omnissa-horizonagent-linux-x86_64-2506-*.tar.gz sysadm@x.x.x.x:/tmp/ssh sysadm@x.x.x.xcd /tmptar -zxvf Omnissa-horizonagent-linux-x86_64-2506-*.tar.gzcd Omnissa-horizonagent-linux-x86_64-2506-*/
Run the easy installer. This handles domain join, SSSD configuration, and agent installation in one wizard. When prompted, provide the domain FQDN, the domain join service account credentials, and the OU DN for the computer account. Leave the hostname field blank — instant clones get unique hostnames at provision time.
sudo ./easyinstall_viewagent.sh
The installer will:
- Install realmd, sssd-ad, and krb5-user
- Join the VM to the domain using the provided service account
- Configure SSSD and start the service
- Install the Horizon Agent
After installation reboot the VM and verify the agent service is running:
sudo systemctl status viewagent.service --no-pager
Step 5 – Configure SSSD
The easy installer configures SSSD but leaves use_fully_qualified_names = True and uses the default homedir path. These need to be adjusted so that usernames resolve as short names (required for NFS home directories to work correctly) and the home directory path matches the NFS mount point:
sudo tee /etc/sssd/sssd.conf << 'EOF'[sssd]domains = domain.localconfig_file_version = 2services = nss, pam[domain/domain.local]default_shell = /bin/bashkrb5_store_password_if_offline = Truecache_credentials = Truekrb5_realm = DOMAIN.LOCALrealmd_tags = manages-system joined-with-adcliid_provider = adfallback_homedir = /home/%uad_domain = domain.localuse_fully_qualified_names = Falseldap_id_mapping = Trueaccess_provider = addyndns_update = FalseEOFsudo chmod 600 /etc/sssd/sssd.confsudo sss_cache -Esudo systemctl restart sssd
Verify that user resolution works with short names and that the UID matches what the NFS server produces for the same user. Both machines must use identical SSSD configuration to guarantee UID consistency:
id username
Step 6 – Configure NFS Home Directory Mount
Install the NFS client and pam_mount, then enable automatic home directory creation:
sudo apt install -y nfs-common libpam-mountsudo pam-auth-update --enable mkhomedir
Configure pam_mount to mount the NFS share at /home on login. Find the closing </pam_mount> tag in the config file and insert the volume entry before it:
sudo sed -i 's|</pam_mount>|<volume fstype="nfs" server="nfsserver.domain.local" path="/srv/home/hzubtp1" mountpoint="/home" options="rw,sync" />\n</pam_mount>|' /etc/security/pam_mount.conf.xml
Test the mount by switching to a domain user:
sudo -u username -ipwdls -laexit
On first login pam_mkhomedir will create the user’s subfolder on the NFS server automatically with correct ownership.
Step 7 – Restrict Domain Logins to Pool Group
Use realmd to restrict which AD group can log in to this desktop. This ensures only entitled users for this pool can authenticate:
sudo realm deny --allsudo realm permit -g GU_HZ_HZUBTP1sudo realm list | grep permitted
Step 8 – Install Applications
Install any applications that should be available to all users in the pool. In this environment the following were installed:
# PuTTY and Nemo file managersudo apt install -y putty nemo# Set Nemo as default file managersudo tee /usr/share/applications/mimeapps.list << 'EOF'[Default Applications]inode/directory=nemo.desktopapplication/x-gnome-saved-search=nemo.desktopEOF# Add Nemo as default for new user home directoriessudo mkdir -p /etc/skel/.configsudo tee /etc/skel/.config/mimeapps.list << 'EOF'[Default Applications]inode/directory=nemo.desktopapplication/x-gnome-saved-search=nemo.desktopEOF# Google Chromewget -q https://dl-ssl.google.com/linux/linux_signing_key.pub -O /tmp/google.pubsudo gpg --no-default-keyring --keyring /etc/apt/keyrings/google-chrome.gpg --import /tmp/google.pubecho 'deb [arch=amd64 signed-by=/etc/apt/keyrings/google-chrome.gpg] http://dl.google.com/linux/chrome/deb/ stable main' | sudo tee /etc/apt/sources.list.d/google-chrome.listsudo apt updatesudo apt install -y google-chrome-stable# Devolutions Remote Desktop Manager (download deb from devolutions.net first)sudo apt install -y /tmp/RemoteDesktopManager_*_amd64.deb
Step 9 – Disable Automatic Updates
Automatic updates must be disabled on an instant clone template. If the OS updates itself between snapshots it can change the system state unexpectedly or break the Horizon agent. Updates are applied manually by rebuilding and re-snapshotting the template.
sudo systemctl disable --now unattended-upgradessudo apt remove --autoremove unattended-upgrades -ysudo systemctl disable apt-daily.timersudo systemctl disable apt-daily-upgrade.timer
Step 10 – Remove GNOME Initial Setup
Remove the GNOME first-run wizard so users don’t see it on first login. Also add the done flag to /etc/skel so all new home directories get it automatically:
sudo apt remove --autoremove gnome-initial-setup -ysudo mkdir -p /etc/skel/.configsudo bash -c 'echo "yes" > /etc/skel/.config/gnome-initial-setup-done'
Step 11 – Grant Sudo Access
If pool users need sudo access, add the pool entitlement group to sudoers:
sudo visudo# Add the following line at the end:%gu_hz_hzubtp1 ALL=(ALL:ALL) ALL
Verify the syntax is correct before saving:
sudo visudo -c
Step 12 – Clean Up and Snapshot
Clean up any temporary files and shut down the VM cleanly before taking the final snapshot:
sudo rm -rf /tmp/*sudo shutdown -h now
In vSphere, take a snapshot of the powered-off VM. Name it clearly with a version and date, for example 05-final-template-20260609. This snapshot is what you point the Horizon desktop pool at.
Snapshot History
During the build, snapshots were taken at key milestones to allow rollback without starting from scratch:
| 01-base-prereqs | After OS install, VMware Tools, SSH, and Horizon prerequisites |
| 02-domain-joined-nfs-configured | After domain join, SSSD configuration, and NFS home mount working |
| 03-horizon-agent-installed | After Horizon Agent 2506 installation and reboot |
| 04-apps-installed | After PuTTY, Nemo, Chrome, and RDM installation |
| 05-final-template | After disabling updates, removing GNOME setup wizard, configuring sudoers |
Omnissa Documentation:
- Install Linux Dependency Packages for Horizon Agent
- Installing Horizon Agent for Linux
- Install Horizon Agent on a Linux Machine
- System Requirements for Horizon Agent for Linux
- Supported Linux Distributions for Horizon Agent (KB87277)
Other Sources:
Disclaimer: Every tips/tricks/posting I have published here, is tried and tested in different IT-solutions. It is not guaranteed to work everywhere, but is meant as a tip for other users out there. Remember, Google is your friend and don’t be afraid to steal with pride! Feel free to comment below as needed.