
Release date: May 4th 2021
Welcome to my VMware Horizon series. In this session I will simulate a Cloud Pod setup. As I only have one Lab, which means I cannot set up a new connection server linked to a new vCenter server and hosts, I will do the setup in my existing environment. This means that I can skip all considerations when it comes to the networking and firewall piece of the puzzle. I will simply install a new connection server, link this up to my existing vCenter and create a desktop pool there. It is not a very large and complex setup, but my main goal is let a user located in the the site named “FreLab Site”, authenticate with the connection server in this site, HZ-CS-01, and connect to desktops in the other site, “FreLab-DR Site”, using Global Entitlements. This I have tried to illustrate below.

To achieve this I’m planning to create one federation, two sites and two pods containing connection servers and desktop pools, described below.

Using this setup, a user in the “FreLab Site” should be able to connect to virtual desktops in the “FreLab-DR Site” and vice versa, as shown below.

The setup above isn’t without caveats. There are, as mentioned above, several prerequisites that has to be met. For instance, the info below can be quite important:

Also, it can be wise to observe the following limitations:

As there is going to be inter-site traffic, I checked with VMware Tech Zone what firewall ports to open between the connection servers (Applicable to Horizon 7.x):

Anyway, to create this setup, I have identified the following tasks that I have made separate sub sessions about below:
- Cloud Pod initialization
- Add Pod to federation
- Add site to federation
- Move Pod to site
- Tag the connection server
- Create Global entitlement
- Add a desktop pool to a Global Entitlement
- Test
Cloud Pod initialization
Cloud Pod initialization
The first thing I have to do is to initialize the Cloud Pod Architecture feature, from the Settings menu, I click “Cloud Pod Architecture”. From the informative screen on the right, I click “Initialize the Cloud Pod Architecture feature”


An informative prompt asks for confirmation. Once the feature initialization is in progress, I can verify status until it completes.


Once the process above is finished, I can see that it has created a federation, as site and a pod.

The first change I will be making is to rename the federation to my liking.


I also want to change the Site-name, so I select “Sites” from the settings menu, and select the “Default First Site” and click Edit


Finally I will change the name of this primary pod. From the Sites menu, I select the pod and click Edit. I give it a more identifiable name, OK


Having finished making my changes, I can verify my newly created federation, site and pod.

Add Pod to federation
Add Pod to federation
Before I add another connection server to the Cloud Pod setup, I verify that the prerequisites are met.

To add another pod to the Cloud Pod setup, I log into my new connection server and launch Horizon Administrator. From the settings menu, I click Cloud Pod Architecture feature and “Join the pod federation”, which prompts me for the hostname or IP address of the connection server I configured above. I provide the correct credential and click Join.


The Join operation launches and I can verify the status. Once the operation is finished, the new pod is added to the site and federation.


I finalize this part of the setup by editing the Pod name and verify the status, as explained in the Cloud Pod initialization chapter above.


Add site to federation
Add site to federation
As I described to begin with, this setup will consist of two sites. Above I have created one site, “FreLab Site” with two pods, “Primary Pod” and “Secondary Pod”. I will now add a new site to my Cloud Pod setup. From the settings menu I click Sites, and add my new site. For this setup the new site will be named “FreLAB-DR Site”


As show below, I now have two sites.

Move Pod to Site
Move Pod to Site
As part of this simulation and test session, I will move my Secondary Pod to my “FreLab-DR Site”. This I do from the Sites menu. I select my “Default First site” which holds both my pods and choose the Secondary pod and hit Edit.

From the Site dropdown box, I select the FreLab-DR Site.

I now have two sites with one pod in each, excellent.

Tag the Connection Servers
Tag the Connection Servers
Although it isn’t strictly necessary for my setup, I want to add a tag to my Connection Servers. These are handy if Connection Server restrictions are needed at a later time. From the Settings menu I click Servers and click the Connection Servers tab. I select my Connection Servers, click Edit and add my tags.


Create Global Entitlement
Create Global Entitlement
Next, I will create a Global Entitlement. Although this is quite similar to creating a Desktop Pool in VMware Horizon, it differs as this does only defines the Connection Settings and user entitlements. Before I proceed, I check that I adhere to the prerequisites from VMware below.

From the Inventory menu, I select Global Entitlements and click Add to launch the “Add Global Entitlements-wizard”

In the next screen we have the option to either create a Desktop or an Application Entitlement. I Select Desktop Entitlement for this session.

As there are many different ways to configure a Global Desktop Entitlement, I have done a walk-through below which shows how I configured my entitlement.

Note: The User Assignment Policy below is quite important. If the desktop pool you are planning to use with this Global Entitlement isn’t configured with Floating User Assignment and vice versa, the user assignment wont work and you wont be able to add that desktop pool as a local pool in this entitlement. Choose wisely!


Next, I will add the user group I have deemed worthy of this entitlement.

Having finished all my settings for this Global Entitlement, I click Finish…

I now have myself a Global Entitlement named “FreLab_Win10_Primary”

In order to be able to test the scenario I described at the beginning of this page, I will create a second Global Entitlement called “FreLab_Win10_Secondary”, very similar to the “FreLab_Win10_Primary” entitlement.

Add a Desktop Pool to a Global Entitlement
Add a Desktop Pool to a Global Entitlement
Now that my Global Entitlements are created, it is time to add desktop pools to them, but first, prerequisites…

In order to add a desktop pool to my “FreLab_Win10_Primary” entitlement, I click the entitlement first.

From the Local Pools tab I click Add and select a desktop pool on my connection server, HZ-CS-01.


As we can see below, the “W10_Build20H2” desktop pool is now available through this Global Entitlement.

I proceed and add a desktop pool to my secondary entitlement, this time from the HZ-CS-02 connection server in the FreLab-DR site.

Test
Test
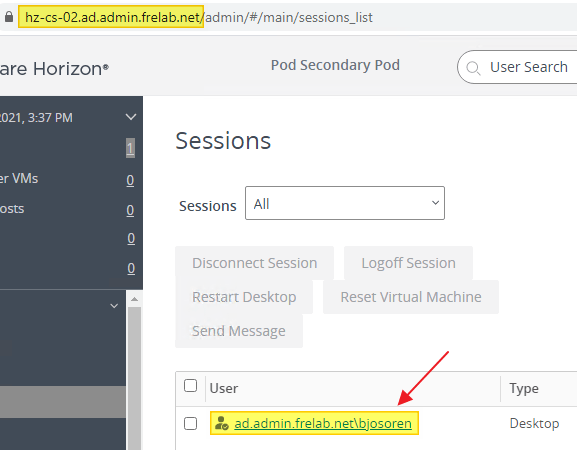
In this first test, I will use HTML Access to connect to the primary connection server, HZ-CS-01. From there, I will launch desktops from the “FreLab Win10 Secondary” global entitlement, thereby testing cross-site access between sites using global entitlements.
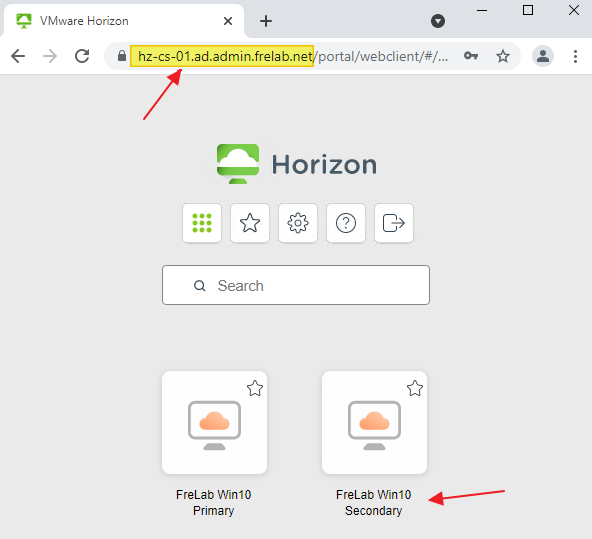
As we can verify below, I’m connected to a desktop on my secondary connection server, HZ-CS-02
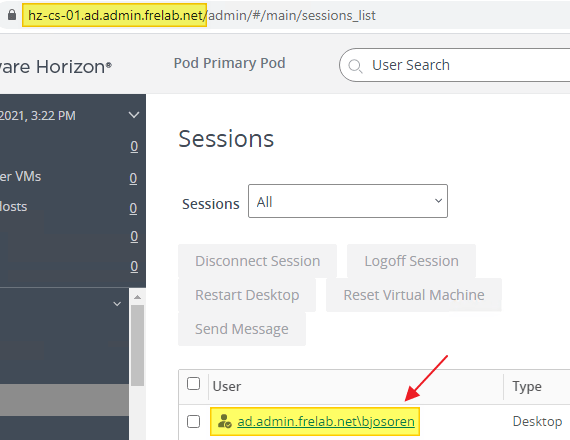
In the second test I will do the opposite of the first test. I log into HZ-CS-02 with HTML Access and launch a desktop from the “FreLab Win10 Primary” entitlement.
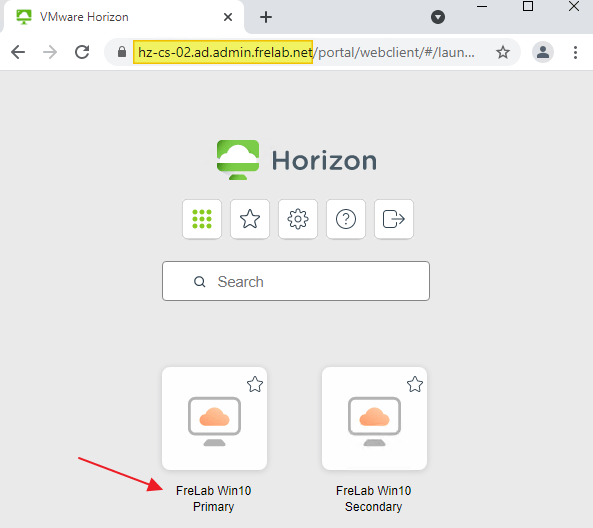
As with the first test, I can now verify that the cross-site access works as planned…..
Although this isn’t a deep-dive into the fantastic features of VMware Horizon Cloud Pod Architecture, it was nice to test the features in my Lab before I go out to my customers and pitch this great feature. Below are additional aspects of VMware Horizon Cloud Pod Architecture that I will be looking at in the future, so stay tuned:
- Setting Up Federation Access Groups in Horizon Console
- Managing a Cloud Pod Architecture Environment in Horizon Console
- Administering Cloud Pod Architecture with lmvutil
Official VMware Horizon Cloud Pod Architecture documentation
My VMware Horizon Lab setup: Planning, deployment etc.
Disclaimer: Every tips/tricks/posting I have published here, is tried and tested in different it-solutions. It is not guaranteed to work everywhere, but is meant as a tip for other users out there. Remember, Google is your friend and don’t be afraid to steal with pride! Feel free to comment below as needed.